


by Ali Kayn
see previous page

These are the detailed instructions on how to install, set up, and use the programs to create the virtual albums, noticeboards and refrigerators. If you find errors, or missed step please fill in a bug report or e-mail the editor (the bug report button and e-mail address are at the bottom of this page)
There are notes throughout the instructions on problems I encountered while converting these instructions from another software package. These projects are what I used to test Corel PaintShop Pro's functionality and user-friendliness.
If you're not familiar with PaintShop Pro X6, then be sure to read the section on opening and saving files, and the section on moving, resizing and rotating before you try any of the projects.
If you are an experienced user, you may want to try the summary project instructions on the previous page.
These are the detailed instructions provided here:
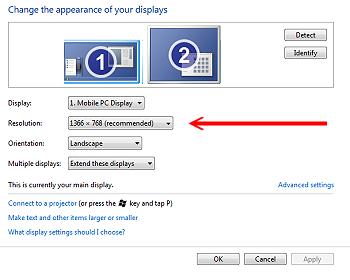
How to Find Out Your Screen Size (Resolution)
1. Right-click anywhere on your desktop that there isn't an icon.
2. Click on Screen Resolution, read the dialog box, but DO NOT CHANGE ANYTHING. Make a note of the screen resolution. This is the size you want your best wallpapers to be. Remember, Bionix Wallpaper Changer and AnyImage Screen Saver will cope if you don't match the resolutions exactly.
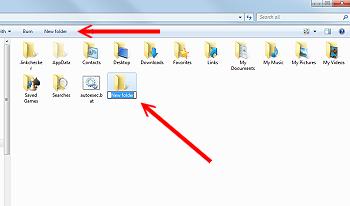
How to Create Folders for this Project
1. Click on the Start Menu button.
2. On the top right hand corner of the popup list should be the name you logged on as, click that.
3. You are now in Windows Explorer. These are your default folder locations. You can create the project folders elsewhere if you like, but for beginners, create your folder here.
4. In the top middle of the screen click on New Folder. A folder icon will appear on the right-hand side of your screen with the words "New Folder" highlighted. Type in wallpapers_source
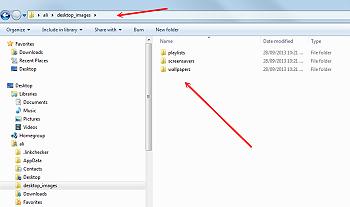
5. Create another new folder called desktop_images (be sure to use the full name, there should already be a folder called desktop)
6. Double-click on the desktop_images folder and use the New Folder option to create three folders in the desktop_images folder:
screensavers
playlists
wallpapers
These folders and names are those which we will refer to throughout the project. The programs themselves will work regardless of what you call the folders and where you put the images, but for a beginner, follow these instructions to make things easier for yourself.
How to Install Bionix Wallpaper Changer
narrative
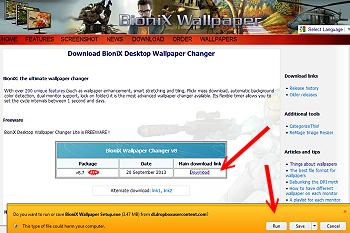
1. Click here to the Bionix web site. You can read more about Bionix Wallpaper Changer if you like.
2. Click on Download at the top centre of the screen.
3. Click on BioniX Wallpaper Changer v8
4. Click on the main download link and then select Run from the dialog box on the bottom of your screen. This will install Bionix immediately. Click through the install options.
When Bionix Wallpaper Changer is installed, the following screen should display. We will point to the folders we created earlier:
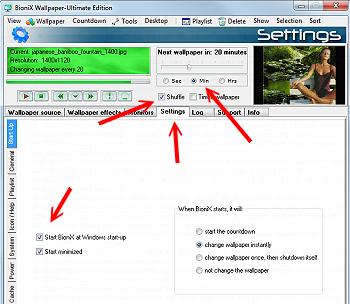
5. From the tabs, click on Wallpaper source
6. On the side of the screen, click on the Lock on folder tab.
7. Click on the browse [...] button, at the bottom of the screen click on the Quick jump to Desktop button.
8. On the left hand side are your default folders, click on your name (or the name you logged on as)
9. Find desktop_images in the list and double-click on that. You should now see the folders we created earlier.
10. Double-click on the wallpapers folder and then click OK at the bottom of the screen.
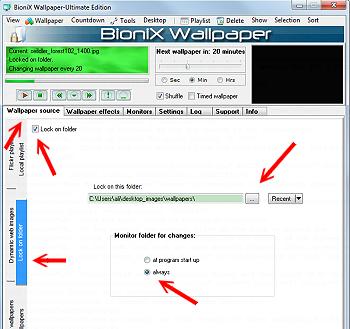
11. Click on the box for Lock on folder
12. Click on the radio button next to always for Monitor folder for changes.
This set up means that any time you add more images to the wallpapers folder, Bionix will add them to the list of wallpapers.
13. Under the Bionix Wallpaper name is a slide for setting how often the wallpapers changes. Click the radio button next to min to make the setting change every 20 minutes. You can go in at any time and change the frequency.
14. If you want to shuffle the wallpapers (show them in a random order) click the shuffle box.
15. Under the shuffle box is the Settings tab, click that and make sure you have ticked Start BioniX at Windows start-up, and Start minimized.
You can experiment with the Bionix settings once you have put wallpapers in the wallpapers folder.
How to Install AnyImage Screen Saver
narrative
1. Click here to go to the RJL Software site
2. Click on AnyImage Screen Saver and click on the download link.
3. Click on Full Windows Installer and when the Windows dialog box appears at the bottom of the screen, click on Run.
4. Don't worry about the cautions, we have tested it. Just click through the rest of the installation.
5. Go back to your desktop and click anywhere there isn't an icon. Select Personalise, and then click on the Screensaver icon at the bottom of the dialog box.
6. Click on the list under the words Screen saver and select AnyImage.
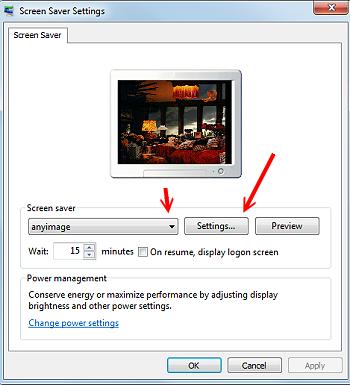
7. Click on the Settings button
8. Click on the Options tab at the top of the dialog box.
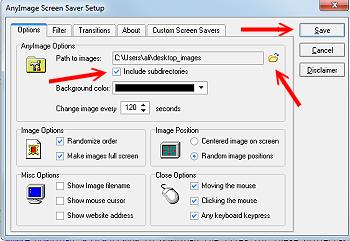
9. Click on the little folder next to the Path to images.
10. Move up the list until you find your name and again, double-click on your name, then double-click on desktop-images. Click OK.
11. Make sure that the include subdirectories box is ticked (just click on it) and click on Save.
11. Click OK again to close the dialogs.
This setup will use all of the images in both the wallpapers and the screensavers folders for your screensaver. Wallpapers need to have a fairly plain section on the left where the icons are. Screensavers can be as detailed as you like, any image can be used.
How to Install the trial version of Corel PaintShop Pro X6
1. Click here to go to the Corel web site
2. Click on the Free trials button and scroll down to PaintShop Pro X6 and click on the Download trial button
3. Follow all the prompts and have PaintShop Pro install to the defaults.
How to Download the files for these projects
Click here to download all the files in a self-extracting file. (If you want to work with JPGs and another software program, the source JPGS are here.
4. Save virtualalbums.exe to wallpapers_source.
5. Go to wallpapers_source and double-click on virtualalbums.exe. This will extract all the files you need for the project examples.
You should have created the folders needed for this project.
How to Open and Save Files in Corel PaintShop Pro X6
We are going to be using two types of files for these projects: pspimage files, which contain many 'layers' or 'objects', for example, the background, the photos, the pushpins are each a separate layer. Saving files as pspimages enables you to go back and change them. JPG files are a 'merged' image, the layers become part of the background and cannot be manipulated.
JPG files are provided as a starting point and will be mainly used by more experienced users.
When you see the File Format Associations, answer None unless you decide to keep PaintShop Pro X6.
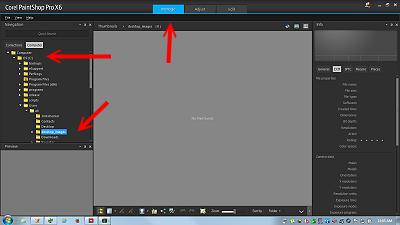
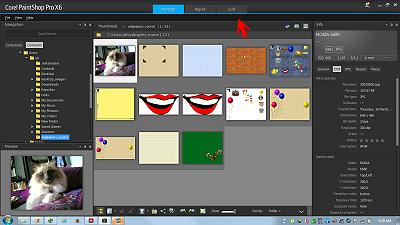
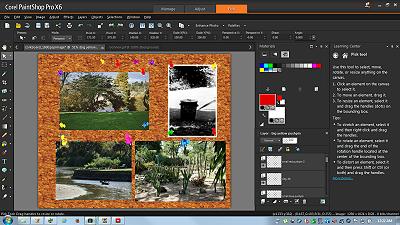
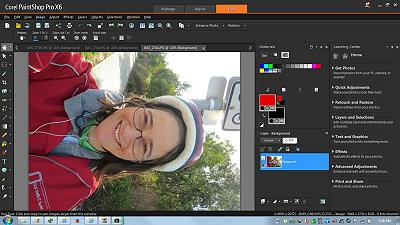
1. Click on the Corel PaintShop Pro icon on your desktop. Note the top middle of the screen, three options, Manage, Adjust, Edit. Manage enables you to navigate through your computer's folders. The image files in the folders appear in the centre of the screen. Edit will be used for our projects to create the wallpapers and screen saver images. At the top left hand corner of the screen are three options, File, View, and Help. If you need more help or tutorials, go through the help pull down menu. Among other things, there are video tutorials on the Corel site that you can access from here.
2. To open a file using Manage, click on the Manage tab, then using the navigation pane on the left, double click on Computer, then C, then Users, then your name, you should then see the list of folders including desktop_images and wallpapers_source
Move your cursor over the different images, see how the names of the files appear. Click on the pale blue paper, then click on the Edit tab.
Look around the screen, it looks pretty busy, but we only need a few options.
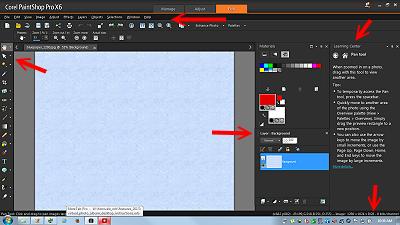
Under the Corel PaintShop name are the Pull Down Menus, starting with File
Down the left hand side of the screen are icons for tools, the tiny down arrow icons indicate that there is a fly-away menu that gives you alternative options. The icon pointed to here is the pick tool.
The blue paper is in the workspace. (The grey section behind it is the 'canvas').
Next toward the right are palettes, materials above and layers below.
On the far right is the Learning Center which provides contextual help for the tools you have selected.
If you move the cursor over the blue paper, a hand appears, like the hand tool icon on the left, this is the pan tool. See the learning center has a little information about the Pan Tool.
To change to the pick tool, click on the pointer (pick tool icon). See how little 'handles' appear on the blue paper. In the Layer palette, the paper is listed as a layer called 'background' and is highlighted. In the Learning Center there is information about the Pick Tool. Under the Learning Center in the status bar is information about the background layer: 1280 x 1024 x RGB - 8 bits/channel. The only information you need to be concerned about is the size, 1280 x 1024.
Experiment with changing the size of the paper background. From the pull down menus, click on Image, then Resize, the top dimensions are how big the image would be if it was printed. Then the pixel dimensions, which is the unit of measurement used for computer monitors (screen resolution). This is where you can change the size of the wallpaper or screen saver image that you are creating. The Pixel dimensions for the paper background should be width: 1280 and Height 1024. This is a common screen resolution. If you have a computer notebook, you may want to change the dimension under New, for example, to 1366 width and 768 height. Click on Ok to change and Cancel to leave without making changes.
To add a photo to the image, click Manage, click on the cat photo and click on Edit. (Alternatively, you can click on the File pull down menu, then Open, and click on 'Beau_kayn.jpg' from the list of files in the wallpapers_source list then click on the Open button. You will see the handsome Birman cat. Note that above him you now have two tabs, one that reads 'bluepaper_1280.jpg and the other that reads 'beau_kayn.jpg'.
If you go through Image, Resize and look at the Pixel dimensions you will see that the image is 640 x 480 (which is also what it says on the status bar at the bottom right of the screen. Remember to click on the Cancel button so that you don't make any changes.
To put the beau_kayn 'layer' (object) onto the blue paper, we use Cut-and-Paste. As it is the only layer it should be selected (see the handles on the edges of the photo). From the Edit pull down menu, click on Copy.
Click on the bluepaper tab, and from the Edit menu, click on Paste as a New Layer. Note how much smaller Beau's picture is because it is 640x480 and the paper is 1280 x 1024 pixels in size.
To change to the pick tool, click on the pointer (pick tool icon).
See the little handles in the corners of Beau's picture. If you point to the handles, small icons appear which are each a tool that does different things. You can play with these. To undo any change you make, press Ctrl-Z (Ctrl and Z at the same time). See the Layer palette at the right there are now two layers listed, the background, and a little photo of Beau labelled 'Raster 1', which is highlighted to tell you that this is the layer you have selected. If you click on the layer, you can type a new name for the layer to 'Beau' and press Enter. When you have a lot of layers in an image, naming the layers can make it easier to work with them.
How to Move, Resize and Rotate Layers (Objects in PaintShop Pro X6)
If a layer is selected and one clicks on Image, Resize, the selected layer should be able to be resized, this doesn't appear to happen -- it resizes all layers. If you have trouble with resizing don't take it personally. Try closing PaintShop Pro and the files and reopening them, that sometimes helped.
To resize the image, if it is working, when you point to the corner of the photo the cursor should change to arrows at both ends. You can also resize the image by clicking on the handles in the centre of the photo and pulling down or up to change the size.
You can also resize one or all layers from the menus. Make sure the photo is selected, then from the Image pull down menu select Resize. Note right at the bottom the check boxes. If you tick Keep Aspect Ratio (by clicking on it), PaintShop Pro will automatically adjust your choices so that the photo stays the same shape. If you untick Resize All Layers only the selected layer, in this case the photo will change size. You can change the size in pixels or as a percentage, for example, 20% makes enough room for say four photos on the noticeboard.
Note when you move the cursor toward the centre of the photo the cursor changes to four arrows. This is the move icon. Try dragging the photo over the paper background.
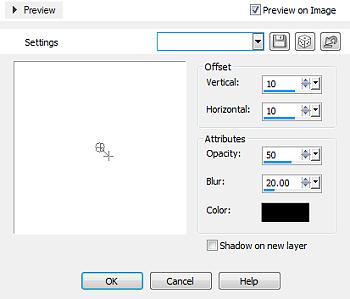
Click on the Effects pull down menu, select 3D Effects, Drop Shadow, don't change any settings and click the ok button. See how Beau's photo seems to float on the page.
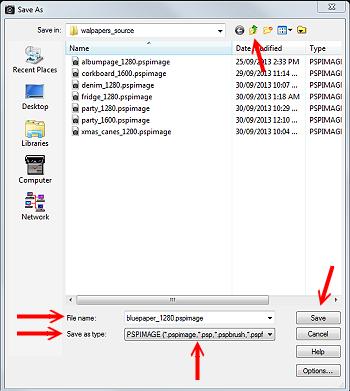
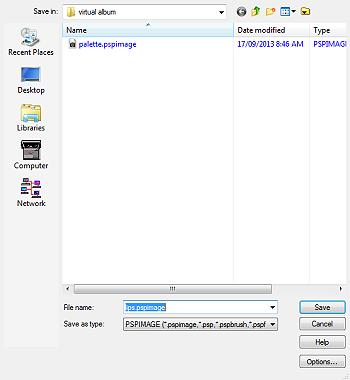
Before you save your work, decide whether you want to make further changes, or to create a single (merged) image. Click on the File pull down menu, then Save As. First let's save our work so that future changes can be made. At the bottom of the screen there are two options, File name and Save as Type. If Save as type is not PSPIMAGE, click on the button and select PSPIMAGE from the list, the file name should now read bluepaper_1280.pspimage. Click the Save button.
To make Beau the first of your wallpapers, Click File, Save As again. This time change the Save as Type to JPG. Click the green up arrow on the top of your screen to go up a folder and there are the folders you saw when you created your project folders. Double-click on desktop_images, then double-click on wallpapers. Now click on the Save button. There will be a caution screen telling you that you can only make limited changes to the new file, that's fine, click ok. If you ever want to make changes, you will do so to the PSPIMAGE file.
To close the files, click on the X for each black tab.
Because you have been playing with the Beau photograph, you will be asked if you want to save your changes, click on No because you don't want to save any changes at this time.
To close PaintShop Pro at any time, click on the X at the top right of the screen.
How to Create a Virtual Noticeboard
Before you start, find where you have saved your photographs or scanned images to the computer.
1. Using Manage, or File, Open, open the file corkboard.pspimage. (There are two versions for 1280 and 1600 screens, pick the one in the size nearest your screen.
2. You should see a corkboard background and a lot of pushpins as layers (objects).
3. If required, click on the background and use Image, Resize to change the background to your screen resolution.
4. Use Manage or File, Open to find a photo to place on the noticeboard.
5. Use Copy and Paste to copy the photo to the noticeboard.
6. Change the size of the photo to suit yourself.
7. If desired, rotate the photo to make the noticeboard more casual.
8. Select one of the pushpins and drag it over to the photograph and place it as if the pushpin is holding the photo in place.
9. Repeat this process as you add photos to the noticeboard.
Remember you can make the photos seem to float on the noticeboard by using the Drop Shadow option you learnt earlier.
How to Crop a Photo
You can just pick a section of the photo, that is crop the photo. This removes unnecessary details and emphasises the most important part of the photo.
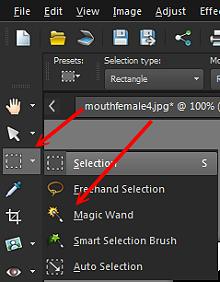
1. After you open the photo, check the tools at the left. Make sure that the photo is selected. Click on the select rectangle tool. It is directly under the pick tool. (There are several different ways to make selections. If the dotted square isn't visible, click on the little down arrow to bring up the sub-menu and click on Selection.)
2. To select an area, click on one corner of the area, then holding your finger on the left mouse button, drag the cursor to the opposite corner, then release the mouse button. The selected area will have a dotted rectangle around it. If you don't like the selected area, simply click and drag again.
3. When you have selected the area you want to be your whole photo, click on the Image pull down menu, then click on Crop to Selection. You haven't changed to photo on your computer, but you have changed the photo you are working with.
Remember, if you don't like the change, use Ctrl-Z to undo it.
To Create Additional Pushpins
Select a pushpin, right-click and a small menu will appear. Click on Duplicate, then drag the new pushpin away from where it is sitting immediately above the original pushpin. (You can also use Copy and Paste to create more pushpins).
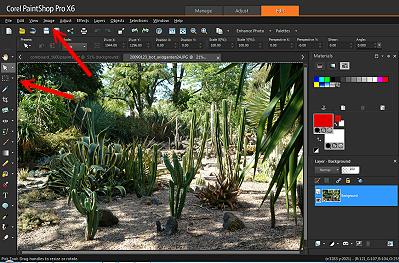
Above is a set of photographs taken at the Royal Melbourne Botanic Gardens.
I'd like to talk about creating groups by selecting the pushpins and the photo they create, but I don't find that there is an easy way to select a set of objects just by clicking on them, or by drawing a selection rectangle around them.
You can make a more casual board by rotating the photos and putting them on the virtual noticeboard askew. If you want to experiment with placing them partly on top of one another, try the Layers pull down menu, Arrange, and play with those options. Remember, you can Ctrl-Z one or more times to undo changes.
How To Use Hue And Saturation To Change Colours of the Pushpins
I tried to resize a pushpin here and found that (a) it was almost impossible to get the handles and (b) that when I used the menu the pushpin disappeared altogether, I tried to bring it to the front, but it still didn't appear.
I tried to change the colours of a pushpin by selecting it, then selecting Adjust pull down menu, Hue and Saturation, Hue/Saturation/Lightness and the pushpin did not change colour.
How to Create a Virtual Refrigerator
Before doing this project you should know how to open and save files in PaintShop Pro, how to resize the background, and how to move, rotate and resize layers (objects).
1. Open the file refrigerator.pspimage
2. Click on the background to select it and resize it to your preferred wallpaper size.
3. Open the photos or other images you wish to put on the refrigerator door. (If you have a lot of images open at once, you can tab through them using the arrows on either side of the filename tabs above the workspace.)
4. Copy each image to the door, resizing, moving and rotating it. (Remember you can add a drop shadow through Effects, 3D Effects, Drop Shadow)
5. Experiment with placing magnets in place to "hold" the photos. (There are more magnets in the file denim.pspimage. You can open that file as well, select, copy-and-paste as a layer between images.)
Remember to save frequently, use a different name for different versions of the files, and to save finalised images to the wallpapers folder as JPG files.
How To Create Three-Dimensional-Looking Objects (Magnets)
1. In PaintShop, open the file lips.jpg
2. Create a layer that is just the mouth by selecting the white space around it:
3. Click the tab for the lips image, and if you want to keep it, File, Save As, and save it as a pspimage:
Close the file from the File pull down menu, or by clicking on the X on the tab.
4. Save the fridge file under a new name as a pspimage to protect your work so far.
Close the fridge file.
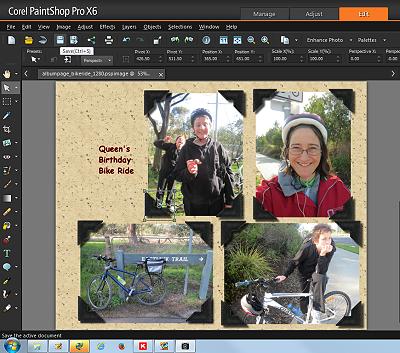
How to create a Virtual Photo Album Page
Creating the virtual photo album pages is the same as creating a virtual noticeboard, but instead of using pushpins on a corkboard background, you will use photo corners on a paper background.
Open the photos that you want to place on the album page. If you want to change the orientation, for example, for a portrait photograph, click on Image pull down menu and then select one of the Rotate options. Remember you can Ctrl-Z if you change in the wrong direction.
To lift the photo corners on top of the photos, click on Layers pull down menu, Arrange, Bring to Top
To line up the photo corners select two corners, click on Objects pull down menu, Align. To select two objects, click on one, then hold down the shift-key and click on the next. Don't be discouraged if this doesn't seem to always work, it often didn't work for me.
There doesn't seem to be an ability to move multiple layers at the same time unless they are part of a defined group, this is a shortcoming of PaintShop Pro.
There is an option on the fly-away menu from the Selection tool (the rectangle), but it seems to select the background layer, which makes it pretty useless for selecting the layers above, and the I couldn't get the de-selection (Ctrl-Shift) to work. There is also a selection brush, but that selects the background layer as well, which isn't really what you want, especially if you can't deselect it.
To create a group, use the layers palette and then Ctrl-click on each of the layers (photo and corners)
Under each photo you may want to put a caption to describe the photo.
Adding Text to Your Virtual Album Page
1. From the tools on the left hand side of the screen, click on the T (for Text). Note that every time you change tools, the options above the workspace change. When you select T for text there is a list font names, you can drop this list down and change the appearance of the text.
2. Click on the place on the page where you want the text to appear and then start typing. You will see that the colours of the text are those in the materials palette on the right of the workspace.
How to Create a Virtual Photo Album Cover
The Virtual Photo Album Cover uses the fill option.
1. Open familyalbum_cover_1280.pspimage. (There is an alternative 1400 width image also.)
2. Click on the white area inside a window. Note the size on the bottom right hand corner of the screen doesn't change to the size of the selected object, nor does any of the information above the workspace indicate the size of the image. For this to look right, you should crop an image to approximately the same dimensions.
3. I cheated this by copying the window layer over the photo and resizing the photo around it. It's messy but they only way I could find to match the window with the photograph. There should be some kind of fill function to do this but it isn't documented under fill in the help or the learning center.
4. The shadowed boxes are a bit complicated to create in PaintShop Pro. Select the Image pull down menu, Add Border, then click on the colour box and use the dropper to point to a dark colour. Change the top and right settings to, for example, 20 pixels. Change the left and bottom settings to 0. Click ok. Repeat the process selecting a light colour and set the top and right to 0 and the left an bottom to 20. Pick a light colour, e.g., light grey. (There should be an easier way to do this, but I can't find it.)

5. The text Family Album is a layer, not text, to change the text, delete the words Family Album and replace them with an album title of your own.
You will notice that there is also a file called planks_1280.jpg. This is a virtual wall, you can try for yourself putting photographs or other objects on the wall, and even using the 3D effect of picture frames to 'frame' the photographs. I can't do it because there are no picture frames to choose from in my frames list.
You needn't limit your wallpapers and screen saver images to these collages. You can copy any digital photographs or other images into the wallpapers or screensavers folders and they will be added to the playlists.

In our next issue, we will play around with creating virtual views through the windows in photographs.
Credits: clipart and backgrounds are taken from products now owned by Corel Corporation. The family album photographs are courtesy of Pauline Benzies Laing. The cat photographs are Ali's.
by Ali Kayn

 Published in Melbourne, Victoria, Australia